 | The recommended file system formats are NTFS and ReFS. Installing SQL
Server on a computer with FAT32 file system is supported but not recommended
as it is less secure than the NTFS or ReFS file systems. |
| Do no try to install SQL Server 2019 on a compressed, mapped, encrypted or
read-only drive, because
setup will block the installation. |
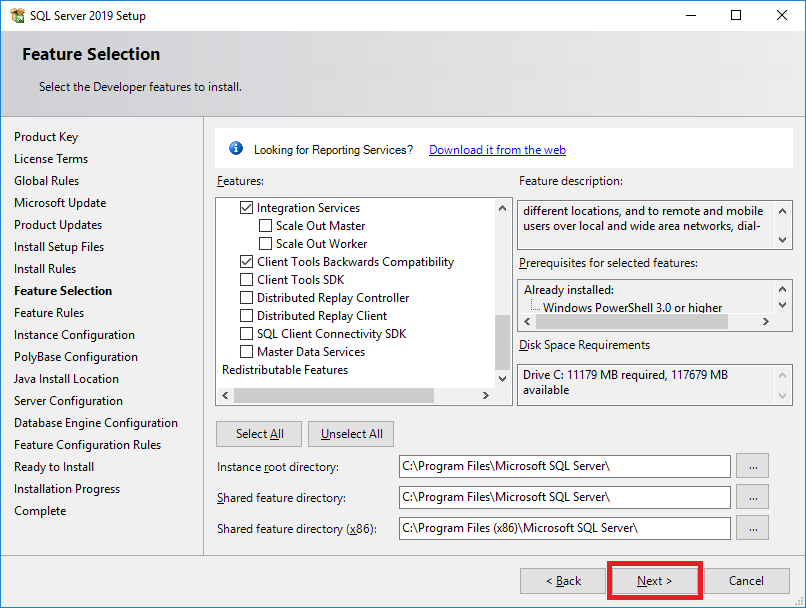
| SQL Server 2019 does not provide a 32-bit version anymore. All SQL
Server 2019 features are supported on x64 (64-bit) systems, but only the
following subset of features are supported on x86 (32-bit) systems: Data
Quality Client, Client Tools Connectivity, Integration Services, Client
Tools Backwards Compatibility, Client Tools SDK, Documentation Components,
Distributed Replay Components, Distributed Replay Controller, Distributed
Replay Client, SQL Client Connectivity SDK. |
| During installation of SQL Server, Windows Installer creates temporary
files on the system drive. Before you run Setup to install or upgrade SQL
Server, verify that you have at least 6.0 GB of available disk space
on the system drive for these files. This requirement applies even if you
install SQL Server components to a non-default drive. |
| Actual hard disk space requirements depend on your system configuration
and the features that you decide to install. Database Engine and data files,
Replication, Full-Text Search, and Data Quality Services require (1.48 GB);
Database Engine (as above) with R Services (In-Database) 2.7 GB; Database
Engine (as above) with PolyBase Query Service for External Data (4.2 GB);
Analysis Services and data files 698 MB; Reporting Services 967 MB;
Microsoft R Server (Standalone) 280 MB; Reporting Services - SharePoint (1.2
GB); Reporting Services Add-in for SharePoint Products (325 MB); Data
Quality Client (121 MB); Client Tools Connectivity (328 MB); Integration
Services (306 MB); Client Components (other than SQL Server Books Online
components and Integration Services tools) (445 MB); Master Data Services
(280 MB); SQL Server Books Online Components to view and manage help content
(27 MB); The disk space requirement for downloaded Books Online content is
200 MB. All features around 8.3 GB. |
| Do not install SQL Server on a Domain Controller. Click
here for more information. |
| SQL Server 2019 Enterprise Edition and Web Edition are supported on
Windows Server 2019 Datacenter, Windows Server 2019 Standard, Windows Server
2019 Essentials, Windows Server 2016 Datacenter, Windows Server 2016
Standard, Windows Server 2016 Essentials. It is not supported on Windows 10
and Windows 8. |
| SQL Server 2019 Developer Edition, Standard Edition and Express
Edition are supported on the following operating systems: Windows Server
2019 Datacenter, Windows Server 2019 Standard, Windows Server 2019
Essentials, Windows Server 2016 Datacenter, Windows Server 2016 Standard,
Windows Server 2016 Essentials; Windows 10 Enterprise, Windows 10
Professional, Windows 10 Home. Windows 10 TH1 1507 or greater is supported.
Windows 8 is not supported. |
| Verify Windows Management Instrumentation service (Control Panel ->
Administrative Tools -> Services) is running. |
| Configure your firewall to allow SQL Server access. Click
here for more information
about protocols and port numbers. |
| The user account that is running SQL Server Setup must have administrative
privileges on the computer. |
Step-by-step procedure to install SQL Server 2019.
Insert the SQL Server installation media. Run SQL Server 2019 setup (double
click Setup.exe).
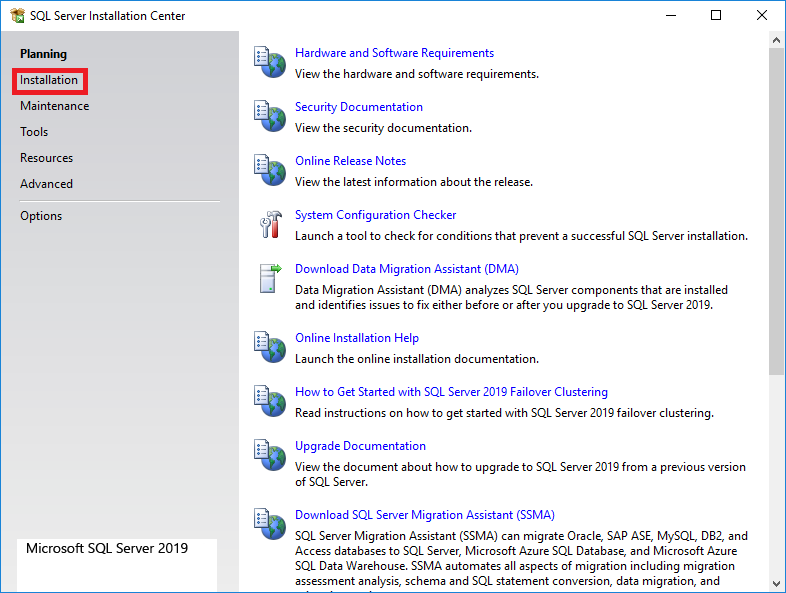
The Installation Wizard runs the SQL Server Installation Center. To create a new
installation of SQL Server, select Installation in the left navigation
area.
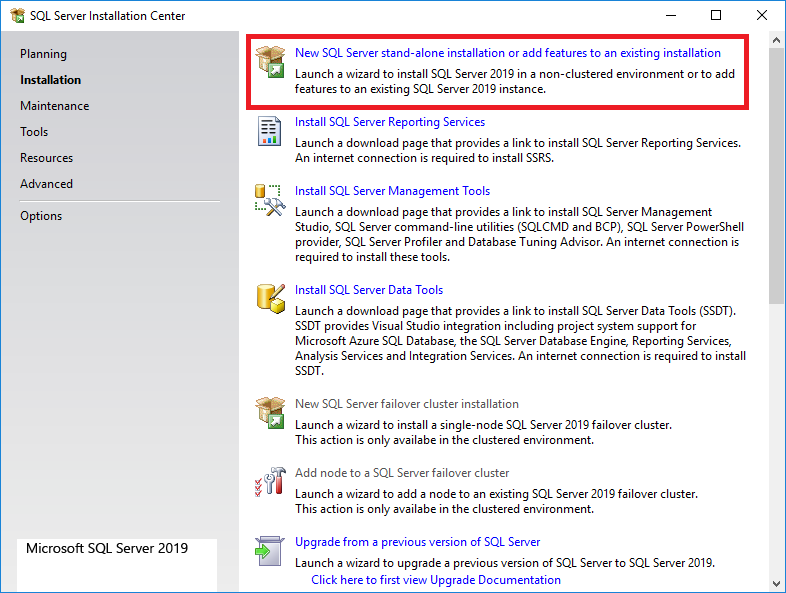
Then select New SQL Server standalone installation or add features to an
existing installation.
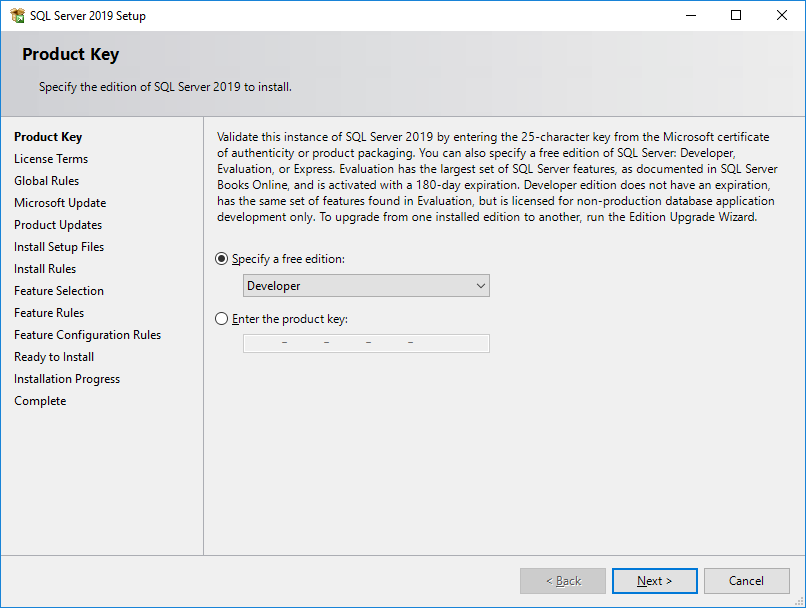
On the Product Key page, select an option to indicate whether you're installing
a free edition of SQL Server or a production version.
If you are installing a free edition of SQL Server, specify the edition of
SQL Server to install
If you are installing a production version of SQL Server, you should provide a product key. Sometimes the product key is
included in the media (the product key is pre-pidded).
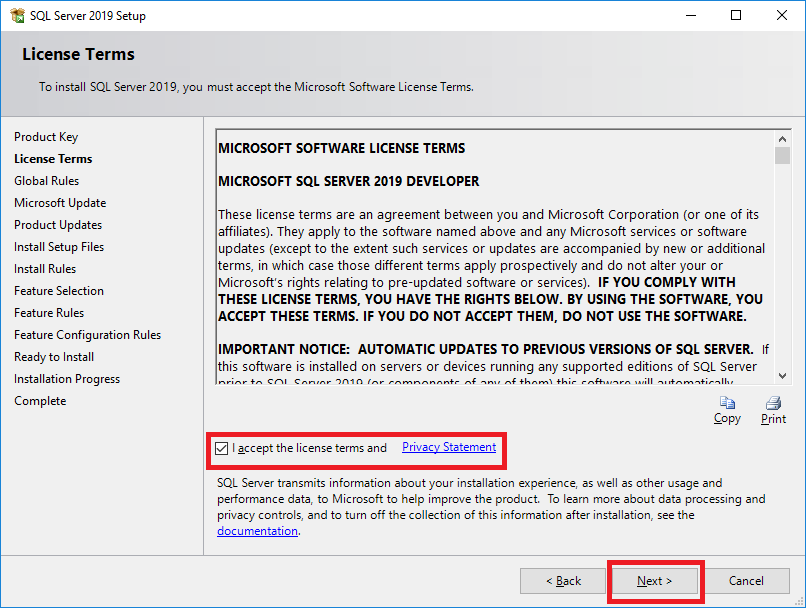
Below image is associated with the License Terms page. Read the
license agreement and if you agree with it, check the "I accept the license terms"
check box, and then click the Next
button.
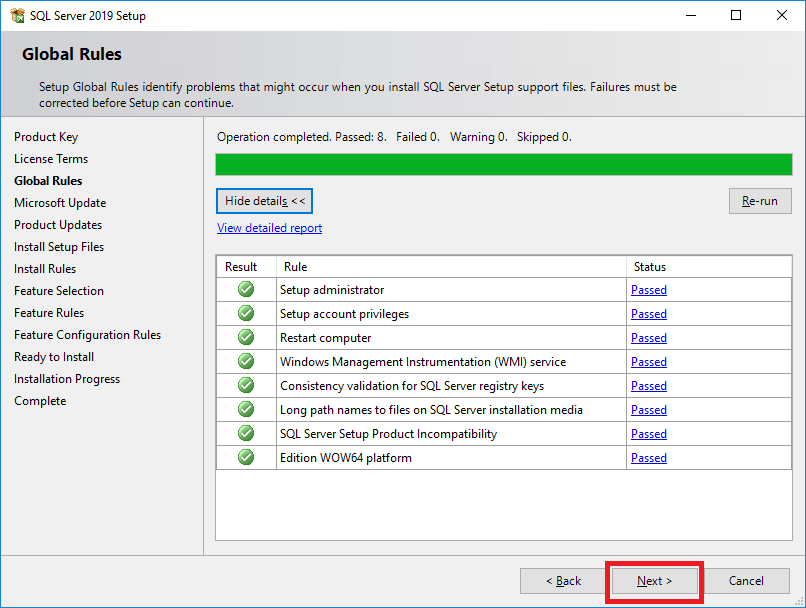
Below screen belongs to the set of Global Setup Rules. Setup will automatically
advance to the Product Updates page if there are no rule errors, so may not see
it.
To have
detailed information about the cause of errors and warnings you may receive
click on the "Show details" button and then click on the blue hyperlinks associated with each warning/error.
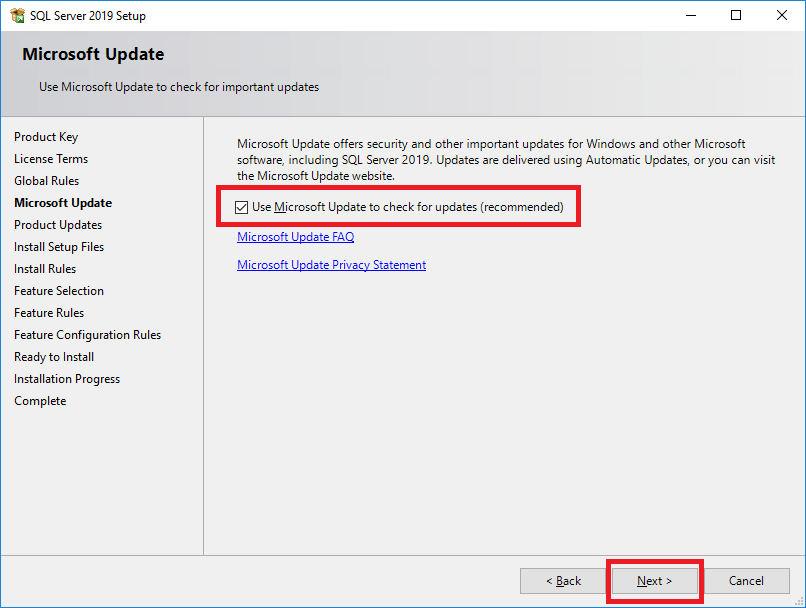
The Microsoft Update page (below image) will appear next if the Microsoft Update
check box in Control Panel > All Control Panel Items > Windows Update > Change
settings isn't selected. Selecting the Microsoft Update check box changes the
computer settings to include the latest updates for all Microsoft products when
you scan for Windows updates.
On the "Microsoft Update" page, SQL Server setup is trying to get updates from Microsoft
Update, and for this reason is important to have Internet access when installing
SQL Server as mentioned at the beginning of this article. Make a click on the
checkbox to get the updates, if the computer has Internet access, then click on
the Next button.
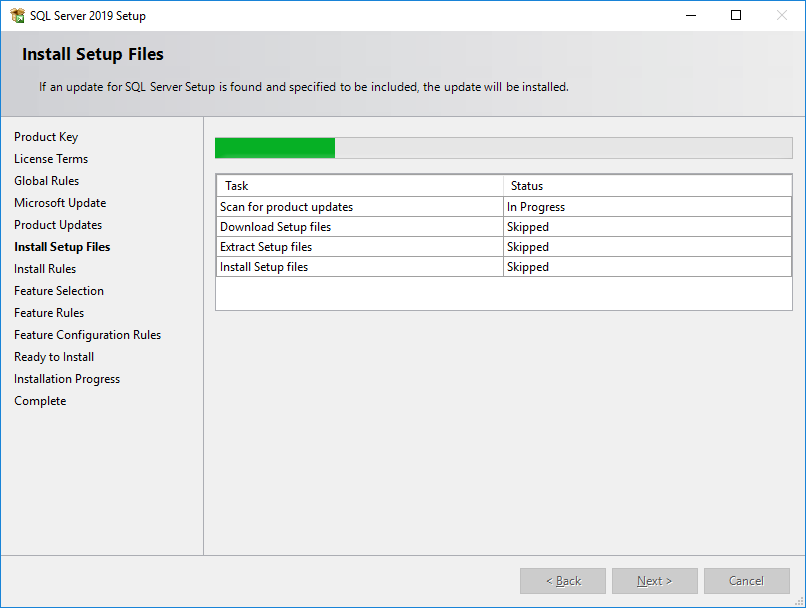
On the Install Setup Files page, Setup provides the progress of downloading,
extracting, and installing the Setup files. If an update for Setup is found and
you specify to include it, that update will also be installed. If no update is
found, Setup will automatically advance.
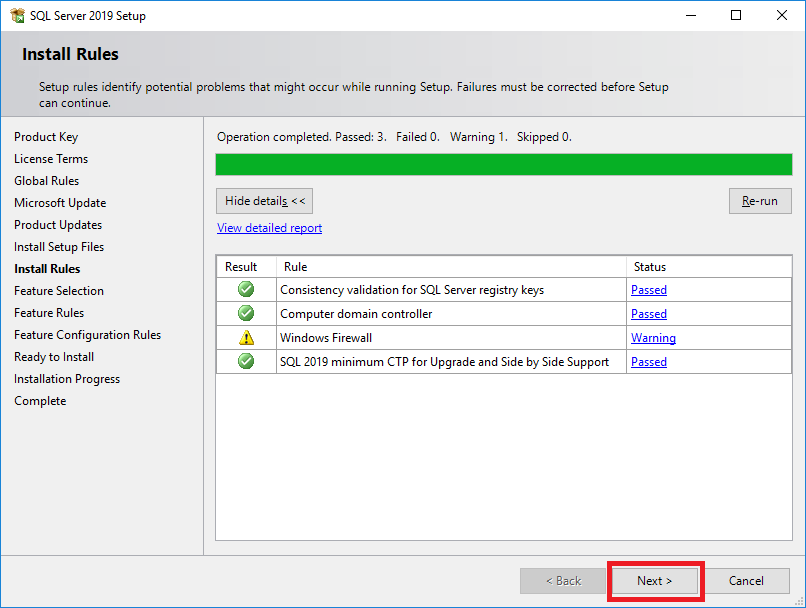
The next screen belongs to the Install Rules page. To have
detailed information about the cause of errors and warnings you may receive
on this page, click on the blue hyperlinks associated with each warning/error.
About the Windows Firewall warning you are seeing on this image, you can go ahead with the installation of
SQL Server, but when it finishes configure your Windows Firewall to allow SQL
Server access or disable it. Click
here to
know how to configure Windows Firewall for SQL Server access.
Alternatively, you can opt to turn off Windows Firewall if you are installing
SQL Server for personal use. You can go to Control Panel and turn it off
Once you configure Windows Firewall make a click on the "Re-run" button and then
click "Next".
If this is the first installation of SQL Server on the machine, Setup skips the
Installation Type page and goes directly to the Feature Selection page. If SQL
Server is already installed on the system, you can use the Installation Type
page to select either to perform a new installation or to add features to an
existing installation. To continue, select Next.
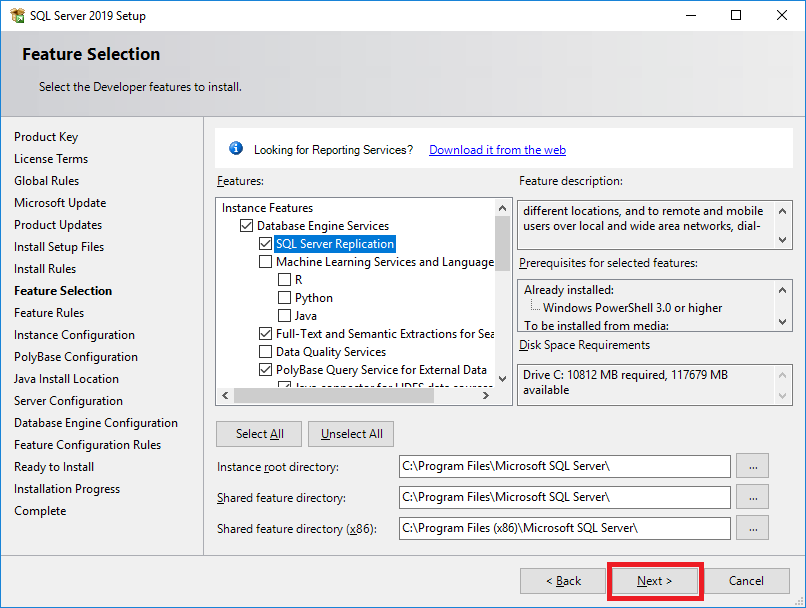
On the Feature Selection page, select the components for your installation. For
example, to install a new instance of SQL Server Database Engine, select
Database Engine Services.
A description for each component group appears in the Feature description pane
after you select the feature name. You can select any combination of check
boxes.
If you are looking for Reporting Services download and install it from
here.
The prerequisites for the selected features are displayed in the Prerequisites
for selected features pane. Setup installs the prerequisites that aren't already
installed during the installation step described later in this procedure.
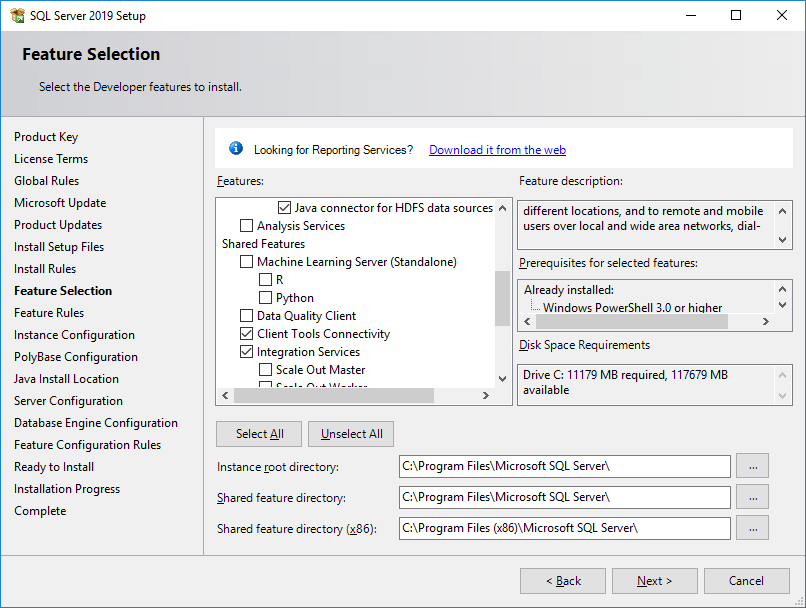
You can also specify a custom directory for shared components by using the field
at the bottom of the Feature Selection page. To change the installation path for
shared components, either update the path in the field at the bottom of the
dialog box or select Browse to go to an installation directory. The default
installation path is C:\Program Files\Microsoft SQL Server\nnn\.
SQL Server uses two directories for shared features: Shared feature directory
and Shared feature directory (x86).
Once you have selected the features to install, please click on the "Next"
button. On below screen we are basically installing database engine services
with Polybase, Full-Text Search and Integration Services.
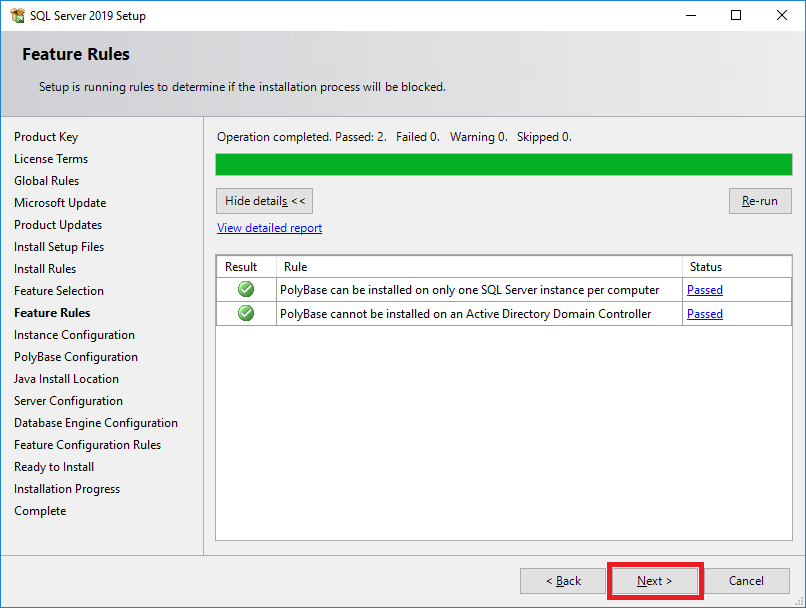
The Feature Rules page automatically advances if all rules pass.
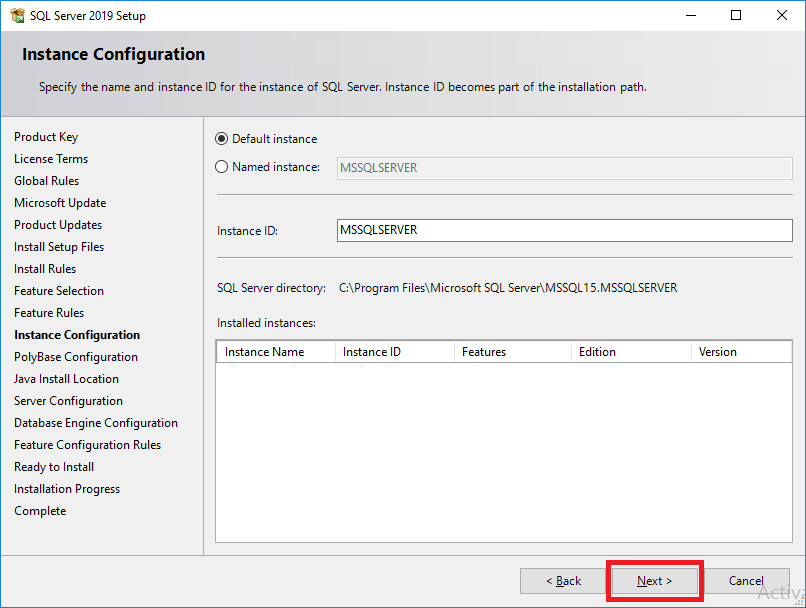
On the Instance Configuration page, select a default or named instance for your
installation. SQL Server supports multiple installations on the same computer,
each installation receives the name of "instance". The default instance gets the
name of the computer, but the named instances, receive the name of the computer
plus the name provided by the user on this setup page. To access a default
instance once it is installed, using SQL Server Management Studio or any other
program, you just need provide the computer name. To access a named instance,
you will need to provide the name of the instance in the forma of computername\nameoftheinstance.
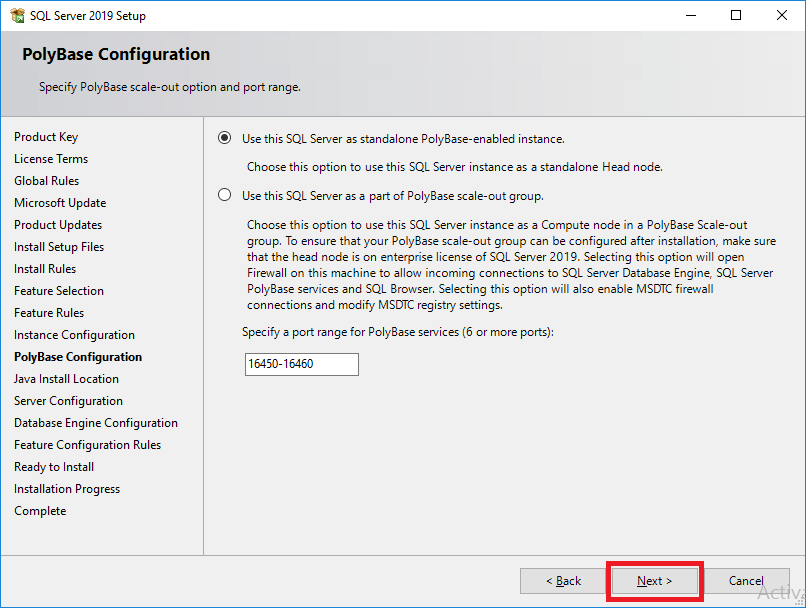
On the PolyBase Configuration page of SQL Server setup, select the standalone
option to configure this SQL Server instance as a standalone PolyBase head node.
Choose the second option to use this instance as part of a PolyBase scale-out
group, and this will open the firewall to allow incoming connections to the SQL
Server Database Engine, SQL Server PolyBase Engine, SQL Server PolyBase Data
Movement service and SQL Browser. The firewall will be opened to allow incoming
connections from other nodes in a PolyBase scale-out group. Selecting the scale
out option option will also enable Microsoft Distributed Transaction Coordinator
(MSDTC) firewall connections and modify MSDTC registry settings. For more information about what scale-out option to choose, click
here.
Please, specify a port range with at least six ports also. SQL Server setup
will allocate the first six available ports from the range.
Starting with SQL Server 2019 (15.x), Polybase no longer requires that Oracle
JRE 7 Update 51 (at least) be pre-installed on the computer prior to installing
the feature. Selecting to install the Polybase feature will add the Java Install
Location page to the SQL Server setup displayed after the Instance Configuration
page. On the Java Install Location page, you can choose to install the Azul Zulu
Open JRE included with the SQL Server 2019 (15.x) installation, or provide a
location of a different JRE or JDK that has already been installed on the
computer.
Starting with SQL Server 2019 (15.x), Java has been added with Language
Extensions. Selecting to install the Java feature will add the Java Install
Location page to the SQL Server setup dialog window, displayed after the
Instance Configuration page. On the Java Install Location page, you can choose
to install the Zulu Open JRE included with the SQL Server 2019 (15.x)
installation, or provide a location of a different JRE or JDK that has already
been installed on the computer.

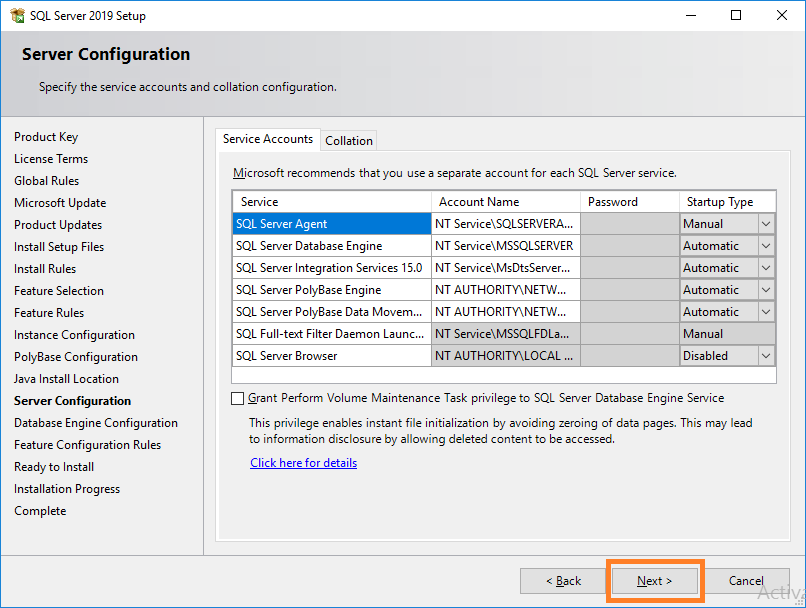
Use the Server Configuration - Service Accounts page to specify the logon
accounts for SQL Server services. The actual services that you configure on this
page depend on the features that you selected to install.
You can assign the same logon account to all SQL Server services, or you can
configure each service account individually. You can also specify whether
services start automatically, start manually, or are disabled. We recommend you
configure service accounts individually to provide the least privileges for each
service. Make sure SQL Server services are granted the minimum permissions they
must have to complete their tasks.
Using Managed Accounts is the default offered by SQL Server setup. If you will
use a Windows account you will need to provide a strong password (you will
provide the Windows account and it password, which should be a strong password
like p@ssw0rd, for example). For more information,
see
Configure Windows service accounts and permissions.
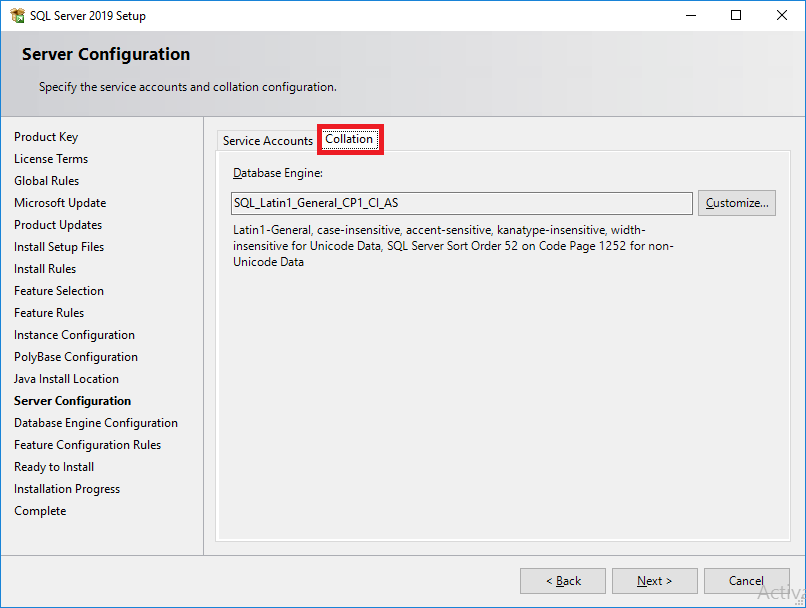
Use the Server Configuration - Collation page to specify non-default collations
for the Database Engine and Analysis Services.
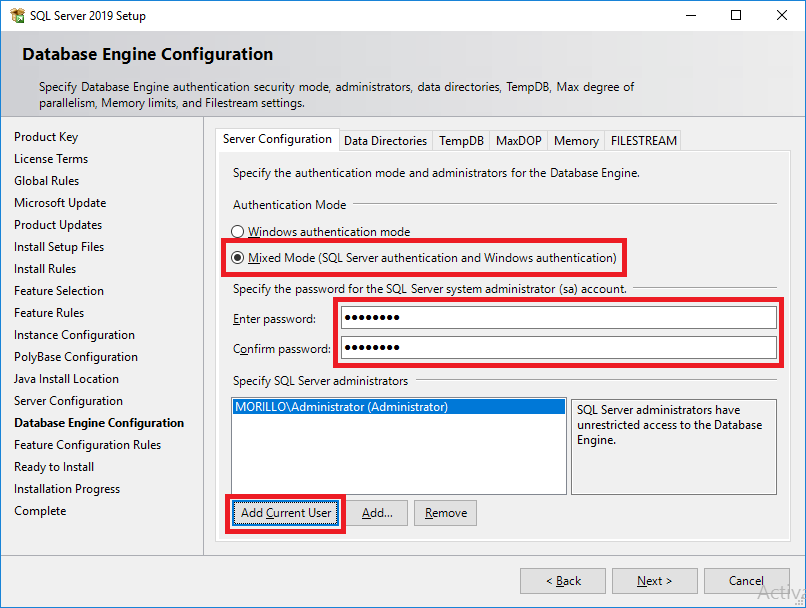
On the next screen, the Database Engine Configuration page (see below image), choose the authentication mode to
use for your SQL Server installation. If you select Mixed Mode, Setup creates an sa account.
Enter and confirm the password for
the (sa) login when you choose Mixed Mode Authentication.
You will get the error "Missing system administrator account. To continue,
provide at least one Windows account to provision ...", if you fail to provide
SQL Server administrators and try to continue with the next page of Setup.
The error message "There are validation errors on this page ..." will also
appear. Click the buttons "Add Current User" or "Add ..." to provide at
least one account that will have unrestricted access to the SQL Server instance
Use the Database Engine Configuration - Data Directories page to specify
nondefault installation directories.
Make sure you have created and configured drives where SQL Server database files
will reside before coming to this setup page, and then change default settings
to represent where you want SQL Server files to reside. It is not recommended to
locate SQL Server database files on the system drive, unless you are installing
SQL Server on your local computer/laptop.

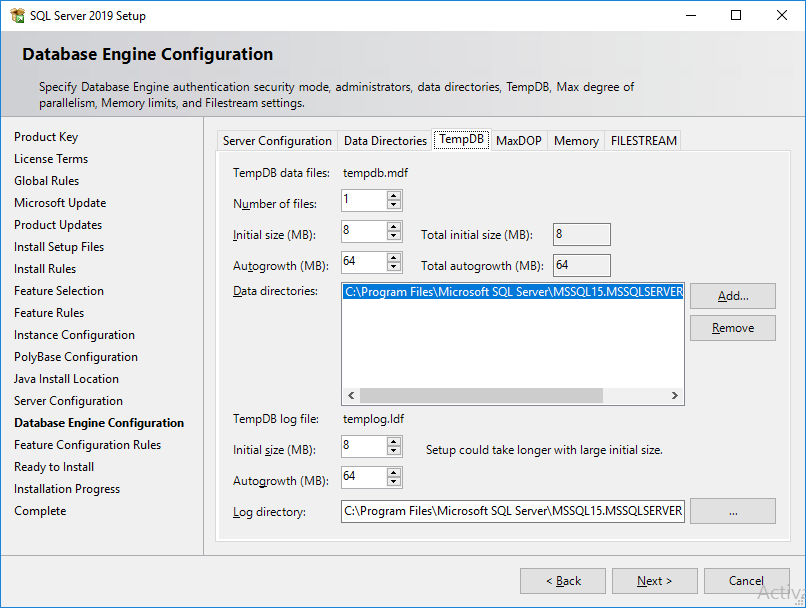
In an effort to simplify the tempdb configuration experience, a new tab
dedicated to tempdb was added to the Database Engine Configuration step of SQL
Server setup workflow with the arrival of SQL Server 2016. That new tab is part
of SQL Server 2019 too.
To configure this tab correctly please visit
this documentation. Do no set the location of TempDB files to the
default location (system drive) if you are installing a production SQL Server
instance.
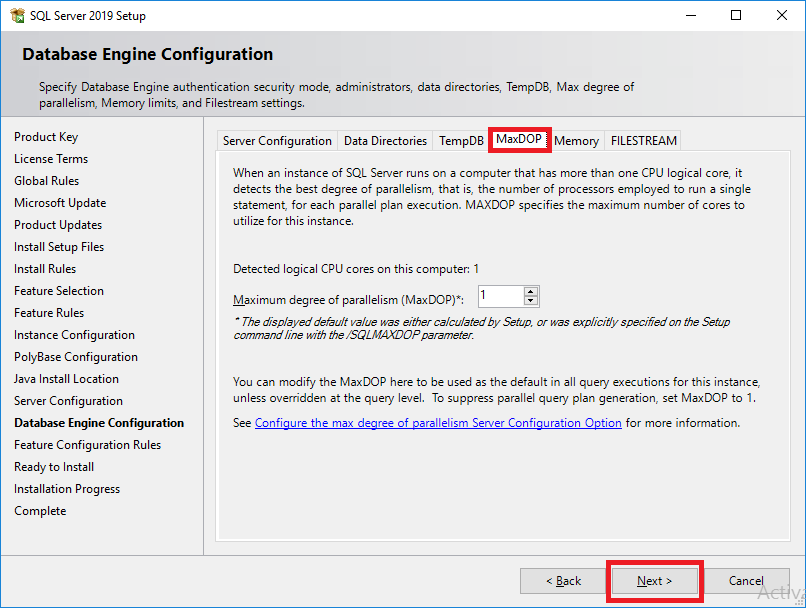
Now follows a new tab named the Database Engine Configuration - MaxDOP. Use this
tab to specify your max degree of parallelism. This setting determines how many
processors a single statement can use during execution. The recommended value is
automatically calculated during installation.
This was a post-installation task by database administrators of production
instances, but not anymore. SQL Server 2019 has it as part of the installation
wizard.
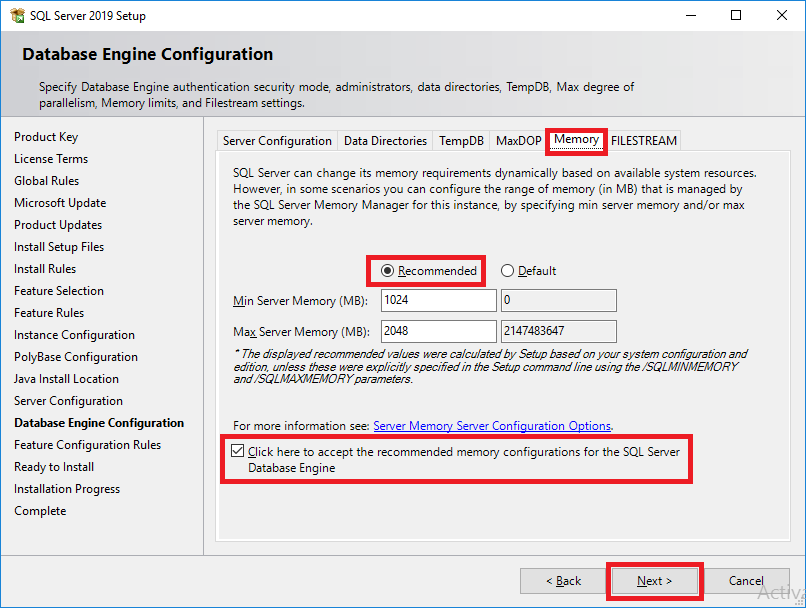
Another post-installation configuration that is now part of SQL Server setup as
a new tab is limiting SQL Server (buffer) memory consumption. Use the Database
Engine Configuration - Memory page to specify the min server memory and max
server memory values that this instance of SQL Server will use after startup.
You can use the default values, use the calculated recommended values, or
manually specify your own values after you've chosen the Recommended option.
Use the recommended values and make a click on the check box at the bottom of
the page, before making a click on the Next button.
If you prefer to manually configure this setup page/tab, please read
this documentation.
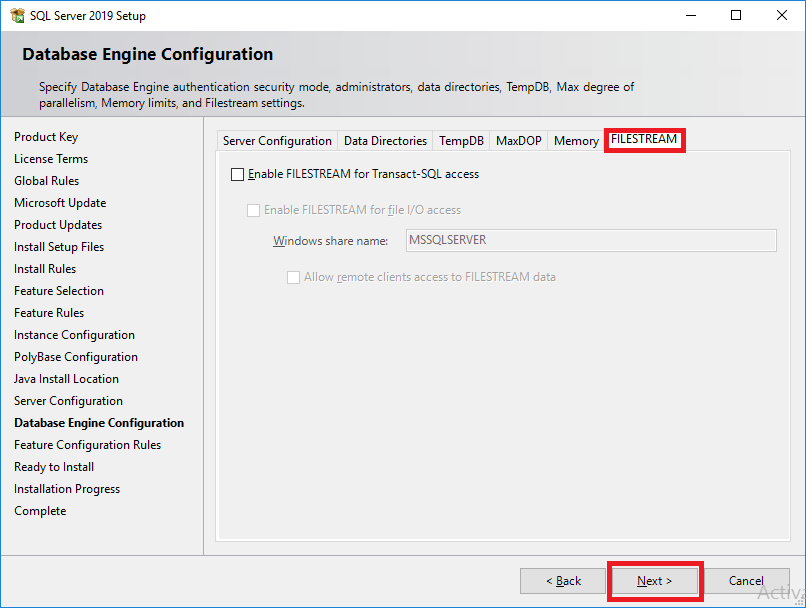
Use the Database Engine Configuration - FILESTREAM page to enable FILESTREAM for
your instance of SQL Server. If you want to configure this feature, you may want
to read this documentation, or else click the Next button.
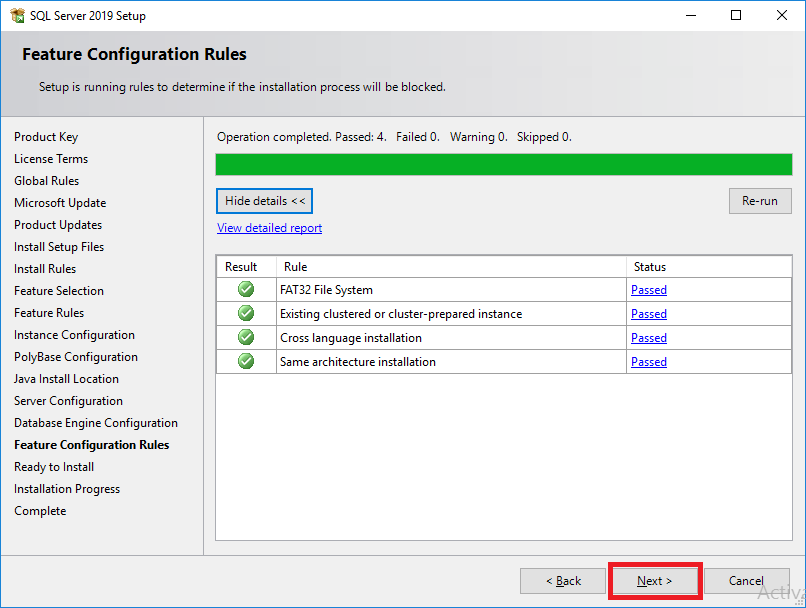
You may not see the following setup page if this installation passes all rules.
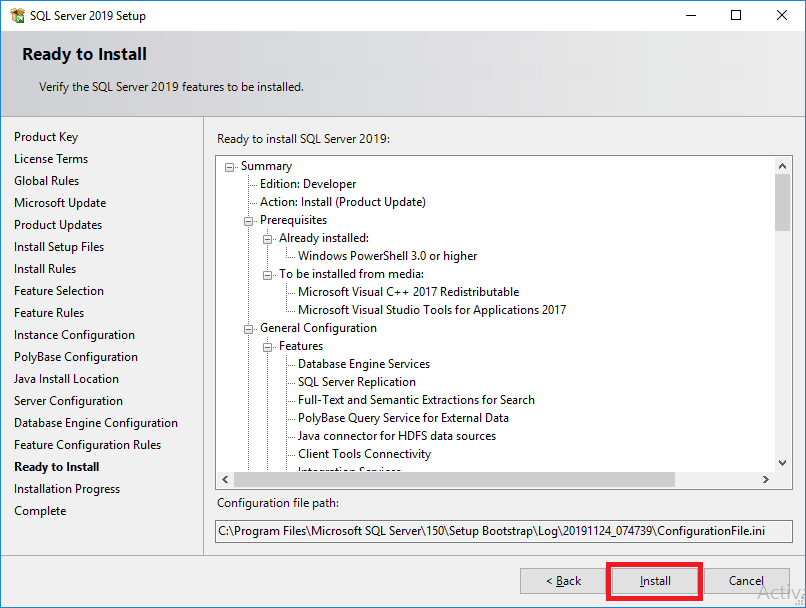
The Ready to Install page shows a tree view of the installation options that you
specified during Setup. On this page, Setup indicates whether the Product Update
feature is enabled or disabled.
To continue, select Install. SQL Server Setup first installs the required
prerequisites for the selected features, then it installs the selected features.
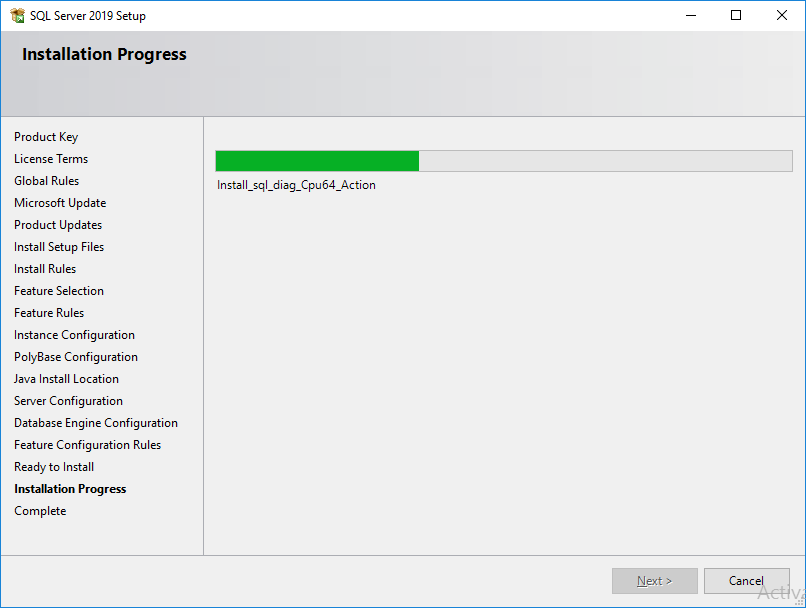
During installation, the Installation Progress page provides status updates so
that you can monitor the installation progress as Setup continues.
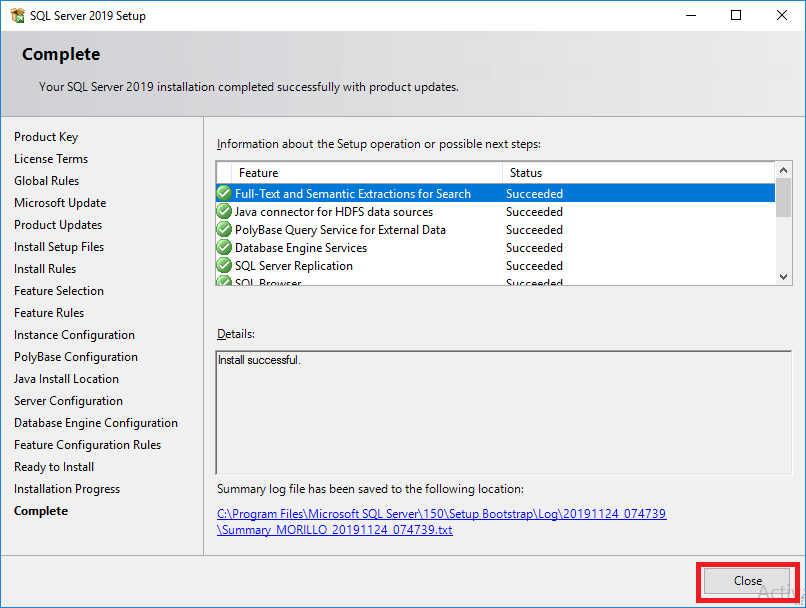
After installation, the Complete page provides a link to the summary log file
for the installation and other important notes. If any of the features listed
did not install successfully, use the link to the summary file to get details on
the cause behind any error. Visit
MSDN SQL Server Setup Forum to get support by the SQL Server community.
To complete the SQL Server installation process, select Close.
If you're instructed to restart the computer, do so now.
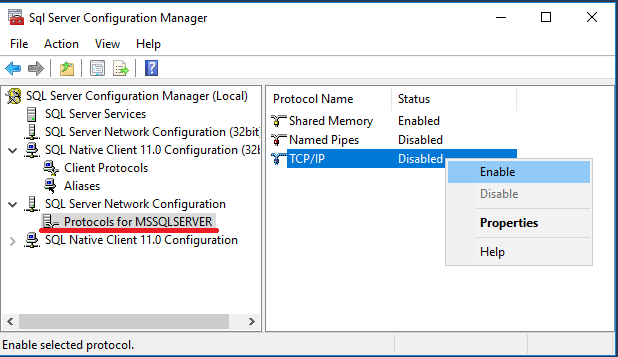
Next, look for SQL Server Configuration Manager on the Start Menu, and open the
application. Make sure you enable TCP protocol if you find is disabled.
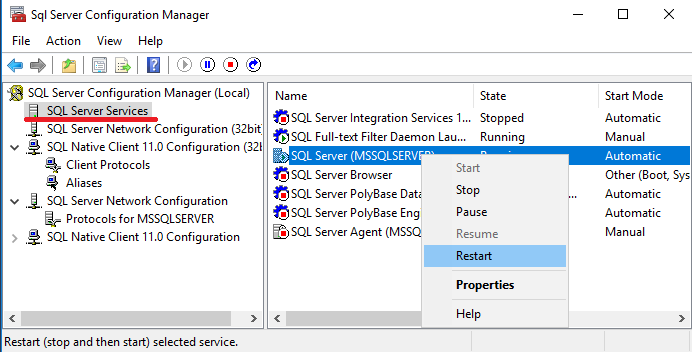
For this change to take effect, you will need to restart SQL Server service.
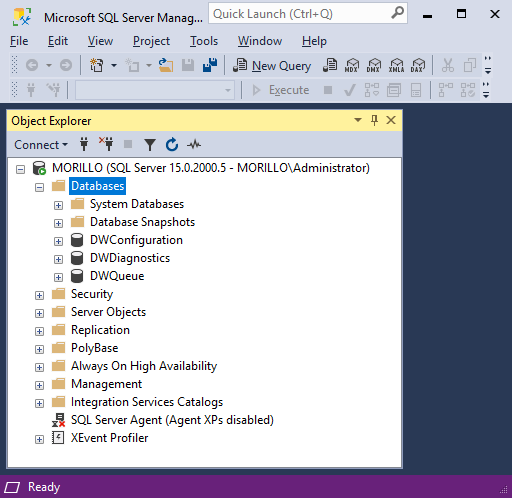
You can connect to your SQL Server instance using
SQL Server Management Studio,
Azure Data Studio or your applications.
![[Company Logo Image]](images/SQLCofee.jpg)
